Tiny Crochet Teddy Bear Pattern Assembly Guide
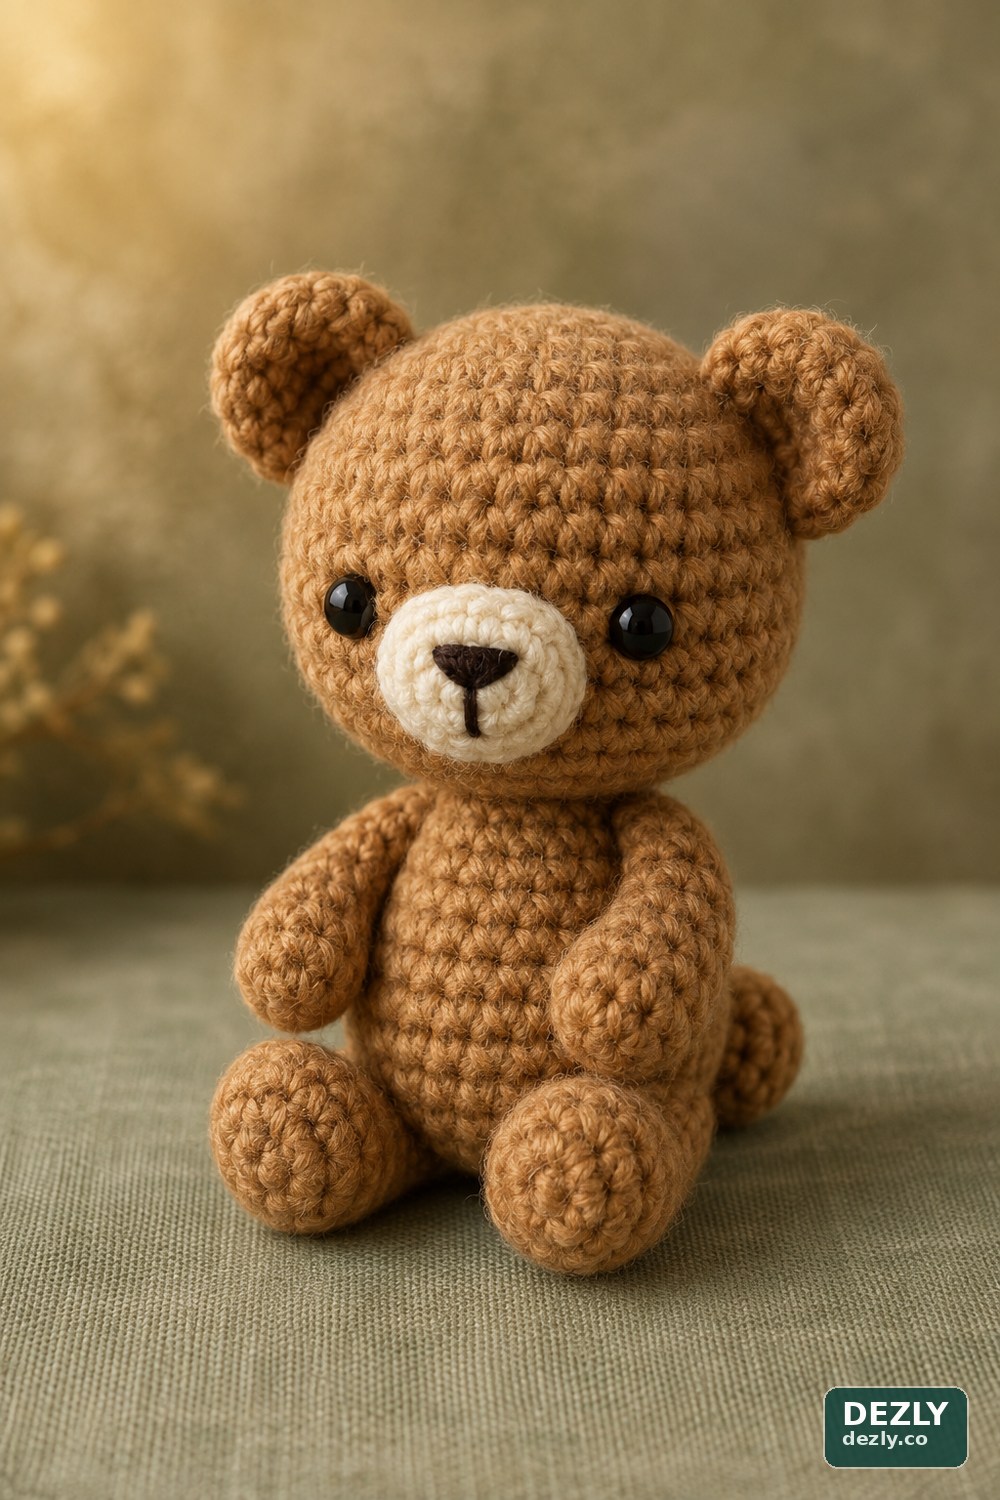
Crochet a compact teddy bear from ten pieces, then use the facial-placement and balancing notes to build a clear expression and steady seated pose. The edited pattern also resolves the snout’s stitch-count mismatch so its oval flows correctly into the next round.
- Pieces
- 10 crocheted pieces
- Hook
- 3.75 mm
- Yarn
- Worsted weight
- Length
- 1,425 words · 7 min
Read the size and safety notes first. Make all ten pieces, count every round, embroider the snout before attachment, and use the flat-surface assembly checks to balance the seated pose.
Materials, scope, and pattern notes
Materials and tools
- 3.75 mm crochet hook
- Worsted-weight yarn in a bear color and a contrasting snout color
- Two 8 mm safety eyes, or black embroidery thread for embroidered eyes
- Black embroidery thread for the nose and mouth line
- Fiberfill
- Stitch markers
- Yarn needle
- Scissors and pins
Project details
- Pieces
- 10: head, 2 ears, snout, body, 2 arms, 2 feet, and tail
- Skills used
- Magic ring, single crochet, increases, decreases, an oval around a chain, stuffing, embroidery, and seaming
- Hook
- 3.75 mm
- Yarn
- Worsted weight
- Gauge and size
- Not provided; the final dimensions depend on yarn, tension, hook, and stuffing
- Yarn quantity
- Not provided
- Terminology
- US crochet terms
Work the pieces in continuous spirals unless a section says otherwise. This edited convention resolves the unstated round method in the supplied instructions. Mark the first stitch of every round, count the round before continuing, and move the marker upward as you work.
Abbreviations and counting
| Abbreviation | Meaning |
|---|---|
| mr | magic ring |
| st / sts | stitch / stitches |
| ch | chain |
| sc | single crochet |
| inc | work 2 single crochets in the same stitch |
| dec | single-crochet decrease over the next 2 stitches |
Parentheses show a sequence to repeat, and “×” shows how many times to repeat it. Brackets give the stitch total after the round is complete. Chain stitches in the snout foundation do not count as a completed round.
Head
The head grows to 36 stitches, holds that circumference for five rounds, and then decreases evenly. Keep the beginning of the round at the back so any slight spiral shift stays away from the face.
Round 1mr, sc 6 [6]
Round 2inc × 6 [12]
Round 3(sc 1, inc) × 6 [18]
Round 4(sc 2, inc) × 6 [24]
Round 5(sc 3, inc) × 6 [30]
Round 6(sc 4, inc) × 6 [36]
Rounds 7–11sc around for 5 rounds [36]
If you are using safety eyes, insert them between Rounds 10 and 11 with approximately seven stitches between their centers. Before attaching the washers, check that the eyes are level, centered on the front of the head, and leave enough room for the snout below them.
Round 12(sc 4, dec) × 6 [30]
Round 13(sc 3, dec) × 6 [24]
Round 14(sc 2, dec) × 6 [18]
Begin stuffing now. Add small pieces of fiberfill and distribute them around the edges before filling the center; this helps preserve a rounded shape without stretching individual stitches.
Round 15(sc 1, dec) × 6 [12]
Round 16dec × 6 [6]
Finish stuffing to an even firmness. Fasten off with a long tail, close the remaining opening securely, and hide the tail inside the head.
Ears make 2
Round 1mr, sc 6 [6]
Round 2inc × 6 [12]
Rounds 3–4sc around for 2 rounds [12]
No ear stuffing is specified. Fasten off with a long sewing tail, flatten each opening, and sew through both layers to close it. Make both ears before attaching either one so you can compare their shape and placement.
Oval snout
The snout begins around both sides of a four-chain foundation. The sequence below gives the stated eight-stitch oval and flows correctly into the ten-stitch third round.
Foundationch 4
Round 2Starting in the second ch from the hook, sc in the next 2 ch, work 3 sc in the last ch; rotate to work along the unused loops on the opposite side, sc in the next ch, inc in the final ch [8]
Round 3(sc 3, inc) × 2 [10]
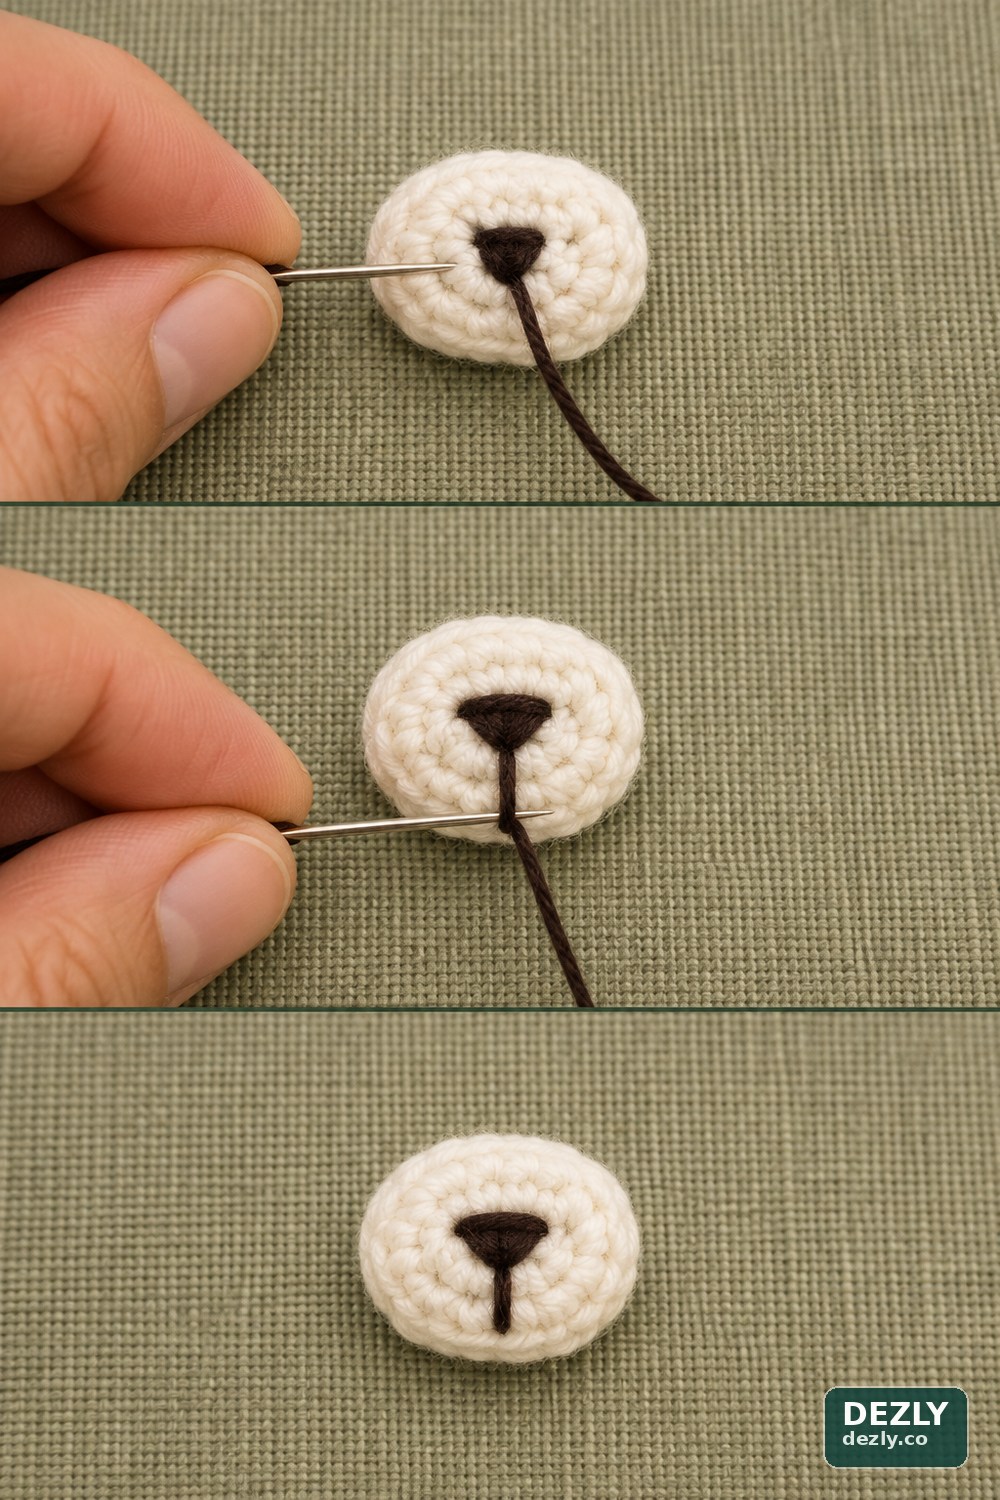
Fasten off with a long sewing tail. Before attaching the snout, embroider a filled triangular nose near its center and add one short vertical line below the triangle. Keep the stitches snug but not tight enough to distort the oval.
Body
The body uses a simple rounded shape that narrows to a 12-stitch neck opening. Keep the base broad and distribute the stuffing evenly so the finished bear can sit against its feet and supporting tail.
Round 1mr, sc 6 [6]
Round 2inc × 6 [12]
Round 3(sc 1, inc) × 6 [18]
Round 4(sc 2, inc) × 6 [24]
Rounds 5–8sc around for 4 rounds [24]
Round 9(sc 2, dec) × 6 [18]
Round 10sc around [18]
Round 11(sc 1, dec) × 6 [12]
Round 12sc around [12]
Stuff the body firmly enough to support the head while keeping the neck edge flexible for sewing. Fasten off with a long tail for joining the body to the head.
Arms make 2
Round 1mr, sc 6 [6]
Rounds 2–7sc around for 6 rounds [6]
Add only a small amount of filling, concentrating it near the lower end. Flatten each opening, sew it closed through both layers, and retain a long tail for attaching the arm to the body.
Feet make 2
The paired increases in Round 2 form the wider front of each foot. Keep that fuller edge facing forward during assembly.
Round 1mr, sc 6 [6]
Round 2(inc × 2, sc 1) × 2 [10]
Round 3sc around [10]
Round 4dec × 2, sc 6 [8]
Round 5dec, sc 6 [7]
Fasten off with a long sewing tail and stuff each foot. Compare the two pieces before attachment so their wider fronts and decrease shaping face the same direction.
Supporting tail
Round 1mr, sc 4 [4]
Round 2sc around [4]
Fasten off with a long sewing tail. No stuffing is specified; flatten the opening and sew it closed. The exact attachment point is chosen during assembly so the tail can act as a small support behind the seated body.
Assembly and facial placement
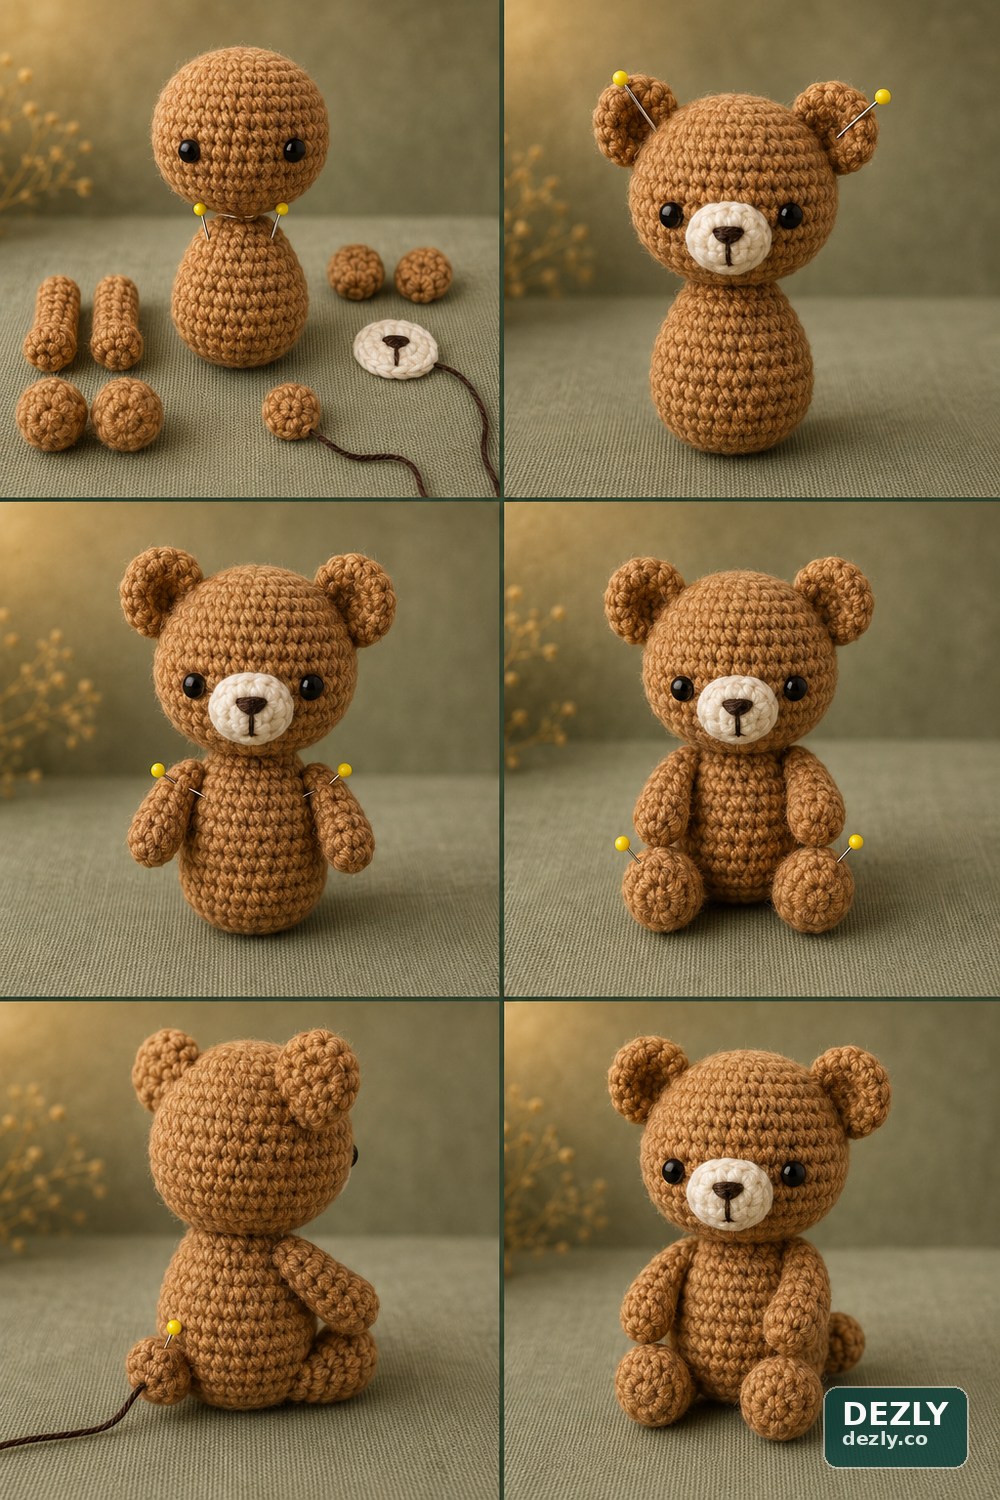
Use pins for every placement decision before sewing. Work on a flat surface and check the bear from the front, side, and back after each major piece is attached.
- 1
Join the head and body. Center the 12-stitch body opening against the base of the head. Sew around the neck, checking every few stitches that the face remains forward and the head is not leaning.
- 2
Attach the snout. Pin the oval below and between the eyes. Check that the triangular nose sits on the facial centerline, then sew around the snout edge without pulling it out of shape.
- 3
Position the ears. Pin both flattened ears before sewing either one. View the head from the front and above to compare their height, angle, and distance from the center.
- 4
Add the arms. Place them slightly forward rather than directly on the side seams. This keeps the arms visible from the front and supports the compact seated silhouette.
- 5
Balance the feet. Set the bear on a level surface, pin the feet near the lower front of the body, and adjust their angle until the figure can mostly support itself. Sew securely after both feet look even.
- 6
Set the tail support. With the bear still on the flat surface, pin the tail low on the back. Move it until it touches the surface and helps prevent backward tipping, then sew it firmly in place.
Final checks
- Secure every seam and hide all remaining yarn tails inside the work.
- Check that the snout is centered and that the nose embroidery is firmly anchored.
- Compare both ears, arms, and feet from the front for balanced placement.
- Place the bear on a level surface and confirm that the feet and tail create a steady seated pose.
- If plastic eyes were used, recheck the washers and keep the bear away from children under three.
The compact teddy bear is now complete. You can change the yarn colors or embroider the eyes while preserving the same stitch counts and construction sequence.
Know someone who would crochet this tiny bear?
Send the canonical article link so they receive the corrected snout count, complete instructions, and assembly images.